2012-08-21

Dark Frame Subtraction & Light Pollution

This is not an article explaining what a dark frame is or how to take one or how to subtract it from an image. It is only to share with you a few test images I made lately (my first actually); I am not relating the two topics (i.e; dark frame subtraction with light pollution!):

No dark frame subtraction
With dark frame subtraction

2012-07-10

Imaging Opportunity: Quadruple Conjunction

Hello again,

This time I am writing to raise your attention to a very amazing celestial conjunction, a quadruple conjunction.

The conjunction involves each of the "waning" crescent moon, Venus (brightest of all except for Crescent), Jupiter, and Aldebaran (alpha Tau).

You may also consider that around the conjunction there is the Pleiades & Capella!

Moonrise time and location prediction

This is an explanation on how to predict the exact location and time of a moon or sunrise. Since a telescope or a camera zoom lens have high magnifications, pointing your manually controlled telescope to the exact location of the moonrise is essential if you want to capture the moon as it rises above the horizon. Otherwise you might miss the first moments of the moonrise while you’re trying to readjust the telescope.

What you’ll need is:
  • Stellarium. You can get it from here
  • Google earth. You can get it from here.
Before you start you must find your observation location in Google earth and set the observation location in Stellarium to your coordinates. Your clock must be synchronized with Stellarium’s clock.

First I checked in Stellarium where the moon is going to rise. In my case it was somewhere around 115 degrees.

2012-07-02

Imaging Techniques -Part 1: Scenic Images

This post is one of a series of short posts on the three main astroimaging techniques; scenic, afocal, and prime focus. This series is also part of a larger series on the fundamentals of astroimaging which are based on a presentation was preparing a while ago. For today I will introduce you to the first, the scenic image which you naturally take quite often. As a start here's the definition of "scenic":
Scenic: Of or pertaining to scenery; of the nature of scenery; theatrical [1913 Webster]
As the definition implies, such an image is one of people or anything in the foreground along with some natural scene in the background. By natural scene I mean a scene of nature; a scene with trees or mountains or land or the horizon or anything Earthly or a combination of those.

This imaging technique is a relatively easy to use as people do it all the time, naturally; all that it requires is some perception. I chose this this particular technique for this post since a very nice imaging opportunity [1] is coming soon which you could use to both learn this imaging technique and to take a nice astroimage with relative ease. All you need is your cam and your tripod (or use your imagination & skills to position the cam on a surface with the right angle & direction; for example you could use a table mount, or an inclined book).

Conventions

This is to make a convention between us (me astrobob & you the reader) regarding some terms I use to ease any confusion that might arise due to those terms. Here's a list of the them and what I mean by them:

  • Date & Time
    • Date: 2012-06-06 (YYYY-MM-DD)
    • Time (HHMM hrs)
      • 0300 hrs = 03:00 AM
      • 1700 hrs = 05:00 PM
    • Examples
      • 2012-06-06 1200 hrs = 2012-06-06 12:00 PM (i.e; mid-day)
      • 2012-06-07 0000 hrs = 2012-06-06 12:00 AM (i.e; mid-night or start of new day!)
  • Words
    • image = photo (astroimaging = astrophotography)

Note: I'll update this list when required.

Thanks for reading :)
and clear skies!

2012-06-28

Venus Transit (2012): Some collected images

Here are my images of the transit (first two). They are not great the setting was not appropriate for astroimaging as I was participating in a public observing event.
I was able to catch these images in between observers:

Through my cams' zoom only!
You can see Venus in the upper centre!
Telescope eyepiece view @ 85x

And here's an image by my collaborator astroZ


Saida, Al Janoub; astroZ

2012-05-28

Transit of Venus (2012)

Hello again :D

    WARNING    Before reading the article, please be warned that looking at  the Sun without appropriate precautions (using solar filters, viewers, etc...) may & will cause partial or complete damage to your sight. Please take appropriate measures in advance &/or participate in a local astronomy group that takes precautions on your behalf by letting you view the transit through its equipment. You have been warned!!!

    A rare event that comes in pairs every 120 years, more or less, occurred on June 8, 2004. This rare event is going to occur in a couple of days as the second of the 2004/2012 pair which will not repeat until the year 2117. In other words, this rare celestial happening is the last one to occur in our lives; no one might be able to witness it again, unless science offers a way to extend the human life span.
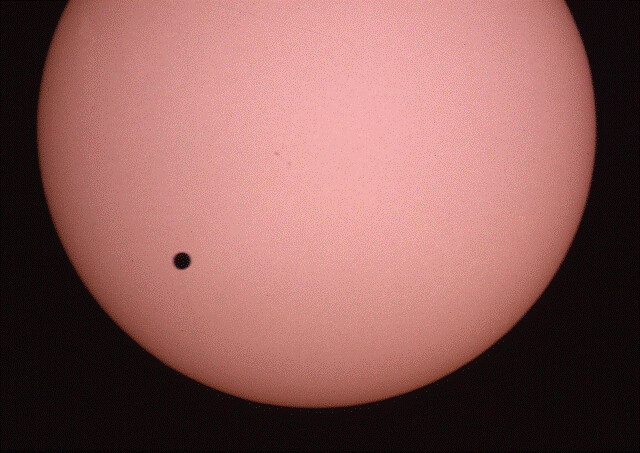
This special event is the Transit of Venus (i.e; transit of the planet Venus in front -from our viewpoint- of the Sun). The two events are separated by about 8 years. This is characteristic of such a phenomenon which occurs twice every 120 years, as I've mentioned above. That is, it occurs in pairs (e.g; 2004/2012). The next pair will start in the year 2117.

Transit of Venus 2004; astroZ (http://flic.kr/p/ac4z8C)

2012-04-22

Catch a Shooting Star!

Last night was the peak of the Lyrid meteor shower. Having never photographed a meteor, I thought this would be a good chance to try to capture a picture of one. And guess what, I got one! Here's the photo:


The picture shows ten minutes worth of star trails and the meteor's streak in the center. So how can you take such a picture? Well, I haven't done much reading about optimal strategy to capture a meteor, but I thought that I'd share my experience on how I managed to take this particular photo.

2012-04-21

Circumpolar Trails and Helpful WebPages on Trails

I recently took another photo of star trails from my home in Saida. The result is shown below:


As you may have noticed, the trails make circles around a point near the center. This point is the north celestial pole, and close to it is the bright star Polaris or the North Star. Polaris is not precisely at the north celestial pole, so it too makes a small trail. This is my first picture of such "circumpolar" trails.

2012-04-15

Close Encounters: Moon and Planets

Every so often, the Moon, planets, or both appear close to each other in the sky. Such an event is called a conjunction and presents a nice and simple astrophotographic opportunity. Photographing such events only requires only a camera and tripod, and because the Moon and planets can be easily seen from the city, a dark site is not required. Any sky calendar will tell you when these events will happen, and so checking these each month will help you plan these photos.
So what are some tips for photographing these events? Here's a few:
-          Try a low ISO as this will minimize noise. You don't need a high ISO setting, as exposures of only a second or so are all that is generally required for these bright objects. You won't gain much from a high ISO except to shorten an already short exposure.
-          Try stopping the camera lens down a bit more than its minimum f-ratio. You don't need small f-ratios because again, the moon and planets are bright. Increasing the f-ratio will help you get a sharper image.

2012-04-12

Stellar Trails

One of the simplest, easiest, and most rewarding astrophotos you can take are star trails photos. All that is required is a camera capable of relatively long exposures, a tripod, cable release, a free computer program, and a moderately dark site.

So what are trails and star trails photos exactly?

Well, as I mentioned in the Camera and Tripod Astrophotography post, trails in any other picture than star trails pictures are a problem for long exposure astrophotography. Trails are caused by the slow apparent movement of stars (or other objects in the sky) due to the Earth's rotation. The reason trails appear in longer exposures of around 20-30 seconds (depending on the focal length lens you're using) is the same reason the sun rises, appears to move across the sky during the day, and then sets. As the Earth rotates, the stars slowly shift to different positions in the sky, and as they move they make lines or trails in your picture.

But, who said trails are not nice looking? Indeed, a star trails picture aims at showing the trails themselves!   

To take a star trails photo, first set up your camera and tripod at your chosen site, and focus your camera on the sky as described in the Camera and Tripod Astrophotography post. Next, aim your camera at the portion of the sky you want to photograph. Aiming for a star trails photo shouldn't be too difficult, as you can catch trails practically anywhere in the sky, as long as you can see stars there. It is nice to try to include a few bright stars in your picture or some terrestrial scenery.

2012-04-09

Catch Mars this Month

     Last month, Mars reached opposition, coming closer to earth than it has been for a while. This month, Mars continues to shine brightly in the sky, but it is quickly fading as it moves farther from Earth. At opposition, Mars grew to a diameter of about 14 arc-seconds, and now is still at a respectable 12''. By the end of April, however, Mars will be around 10'', and in one more month, it will lose another 2''. So what does this mean? Well, if you have a telescope and want to see Mars, you'll want to catch it soon while it's diameter is still large enough to show surface detail. The amount of detail you can see also depends on how big your telescope's aperture is.

     I could see and photograph these surface features with my 8 inch Schmidt Cassegrain telescope in late February. Here's the picture taken with a webcam (more on webcam astrophotography later). Notice the dark, so-called "albedo" features on the Red Planet's surface. You can also faintly see the white polar ice cap on the upper-left of the red planet's disc:


2012-04-08

Camera and Tripod Astrophotography

     You might be surprised to find out that you can do astrophotography without a telescope. But yes, it's true; all you need to take a picture of the sky is a camera and tripod, and perhaps a cable release to trigger the camera. Of course, your pictures will be limited to wide-field and not close-up views of the sky, because magnified views (through a long focal length lens, for example) will probably have trails in them (more on this later), and even if your aim is to photograph trails, you won't capture very many with a close-up view. So what are the subjects you can photograph? Well, practically any constellation is good game. Also up for grabs are the Milky Way, planetary and lunar conjunctions, and even some bright comets. You can even capture some deep-sky objects such as bright nebulae and star clusters, but not in close-up detail. Photographing from a dark, non-light-polluted site will help you capture deep-sky objects and the Milky Way, but this is not a necessity for constellations, the moon, and planets.

     So let's say you've got your camera, tripod, and cable release ready and want to take a picture of the sky…what should you do?

     Well, first of all find what you're photographing! If you're an experienced sky-watcher then this should not be very difficult. If it's a constellation you're after, for example, you'll know where to look. For those not as experienced (and for special events such as conjunctions), there are many aids you can use to figure out what will appear in the sky and where. These include sky charts, magazines, websites, and software such as Stellarium or Starry Night.

2012-04-06

Camera Basics

Whether you already own a camera or are thinking of buying one for astrophotography, these are some things that you should be aware of. The vast array of digital cameras out there may or may not allow you to control the parameters below, but the more control you have over them, the more versatile your astrophotography will be. That is, the more subjects and types of astrophotography you'll be able to do with your camera. So, what are these important camera things you should know?

ISO: This setting dates back to film photography, where ISO was also known as film "speed". Each film was characterized by a certain speed or ISO, which today can be set to a range of values on many digital cameras. Most ISO's range between 100 and 1600 and even up to 3200. To understand what these numbers mean, you need to realize that for every doubling in ISO, the exposure time required will be reduced in half. That is if you need a 10 second exposure at ISO 100, you can practically get the same picture with a 5 second exposure at ISO 200, or 2.5 seconds at ISO 400. The thing to realize with ISO is that although a higher setting will allow you to take shorter exposures (which can be very useful when photographing things that require many minutes or even hours of exposure time), the higher ISO settings will increase the noise in your images. At the end, it's a balance between how long you are willing (or can) expose and how much noise you're willing to tolerate in your pictures. There are tricks to reduce noise, and these will be covered in future posts.

2012-04-05

Where to Start in Astrophotography

     When I took my first astrophoto, I was observing the total solar eclipse of August 11, 1999 from Romania. At the time I was 12, and went to Romania with my Dad. I had with me a film snapshot camera, a Canon film SLR with a 100-200mm zoom lens, and a pair of "eclipse shades" which were being sold there at the time. On the day of the eclipse, my Dad and I took a taxi to somewhere very close to the Romanian-Bulgarian border, next the shore of the Black Sea, which was the closest place from our hotel where the totality of the eclipse would be visible. From the very first moment when the Sun's disc started to be covered by the Moon's till totality I was awestruck. The excitement slowly built as more and more of the Sun disappeared, and in the final moments before totality everything around us turned darker and darker, when in a flash the Sun's disc disappeared and its corona appeared, the sky remained a dark blue, and if I recall correctly a planet and a star or two could be easily seen. Truly an awesome sight!

    Viewing this relatively rare event in itself was a spectacular thing. But I was just as excited to take my very first pictures of something in the sky - my first real astrophoto -  something that I had wanted to do for years before. I handled the snap-shot camera as I had no experience with "professional" cameras, and my Dad took charge of the SLR. I took several pictures through the snap-shot, at first with the eclipse shades, then only a few during totality without the eclipse shades (as I wanted to spend as much time as possible looking and taking in the spectacular event which was happening above our heads). After getting back to Lebanon, I couldn't wait to see how the pictures of the eclipse would turn out. When I did get them back, I quickly went about sorting them through and putting the best ones in a small album. The best looking ones were, obviously, the ones taken by my Dad, through the SLR plus zoom lens. Still, I saved the snap-shot pictures, in which the totally eclipsed sun showed up as a tiny image in a sea of black-sky background.

2012-04-03

Welcome


Hello :)

This will be my first post &; outlined are some thoughts about what I might be posting in the future.
    Therefore I'd like to welcome you to the blog! This blog has been set in the couple of weeks after an idea of creating a Lebanese astrophotography blog to serve two main purposes:

• act as an archive &; reference for Lebanese astrophotographers, &;
• for everyone to benefit from the contributors' experiences

As such, the blog is licensed under a Creative Commons license (please see the Permission of Usage page). This means that you are free to share, distribute, &; modify the material on this blog under the "only" condition that you "attribute" the work to its original author &; blog &; linking back to it. Note that the images in this blog are the sole work of its creators &; all rights are reserved to them unless otherwise stated. Please write to the corresponding author(s) in regard of image permissions.

    First, I'd like to start by thanking astroZ, my kind friend &; astrophotographer, for his Welcome post. It is really exciting to be able to mutually share our experiences on this blog &; share it with you, our fellow readers. We hope that this blog brings something new for you to benefit from on your route towards imaging the night sky. I also like to add that he's been doing a great job hitherto; and I believe he will continue to do so hereafter!
Personally, I've been busy with several things most importantly my studies, Ubuntu testing and other related chores. For the same reasons I have not done any astrophotography, or photography in that matter, since last summer. I just wanted to write this introductory post in hope of following it with some useful posts later on.

    It is interesting to know that astroZ &; I share the same start, relatively speaking. I myself started in astrophotography with a Solar eclipse as well! The only difference is his early start. In my case it all began around March 29, 2006 during the partial solar eclipse (see below for some images from that day). My start was, like astroZ, with a "film" camera; a Canon EOS 750QD to be precise.


    Just a quick note: In regard of software, I mainly use open-source software which you may or may not have heard off or used before. In any case, I will do my best to keep things both readable &; applicable as much as possible. To clarify, I use open-source software since I am not required to pay a hefty price for or use illegal copies of commercial software.

Last but not least, I'd like to make a convention with you: When you read "astrophotography" or "astroimaging", it is the same meaning. Just wanted to make this clear.

Finally, my next post will be on the Fundamentals of (astro)Photography. I will list &; briefly define some terms used in photography &; some preliminary concepts on astrophotography.
Thanks for reading :)
and clear skies!

To a great beginning!

   I was invited to participate in this blog by my good friend and fellow amateur astronomer and astrophotographer Bob Merhebi. I'm not quite sure at this incipient stage how this blog will turn out or what it will become, but I know that its subject is one that is dear to my heart, namely astrophotography. Serious amateur astronomers, let alone astrophotographers are not a very large bunch, especially in my part of the world. Yet, there are many people I know with at least some interest in astronomy or astrophotography, including established amateur astronomers who would like to learn to photograph the skies, and established photographers with a similar interest to produce photographs of astronomical subjects. 

   I wouldn't be surprised to learn that many of the potential astrophotographers out there are perhaps discouraged or sceptical that they might be able to take pictures of the sky with relative ease and without heavy-duty telescopes or other expensive equipment. This is far from true, as with some dedication and perseverance, all you need to take your first pictures of the sky is a camera and perhaps a sturdy tripod. There are techniques, of course, used to photograph the sky that are demanding both in terms of skill and your bank account, but this should by no means stop you from making the most of some simple means and equipment, especially if you're new to astrophotography.